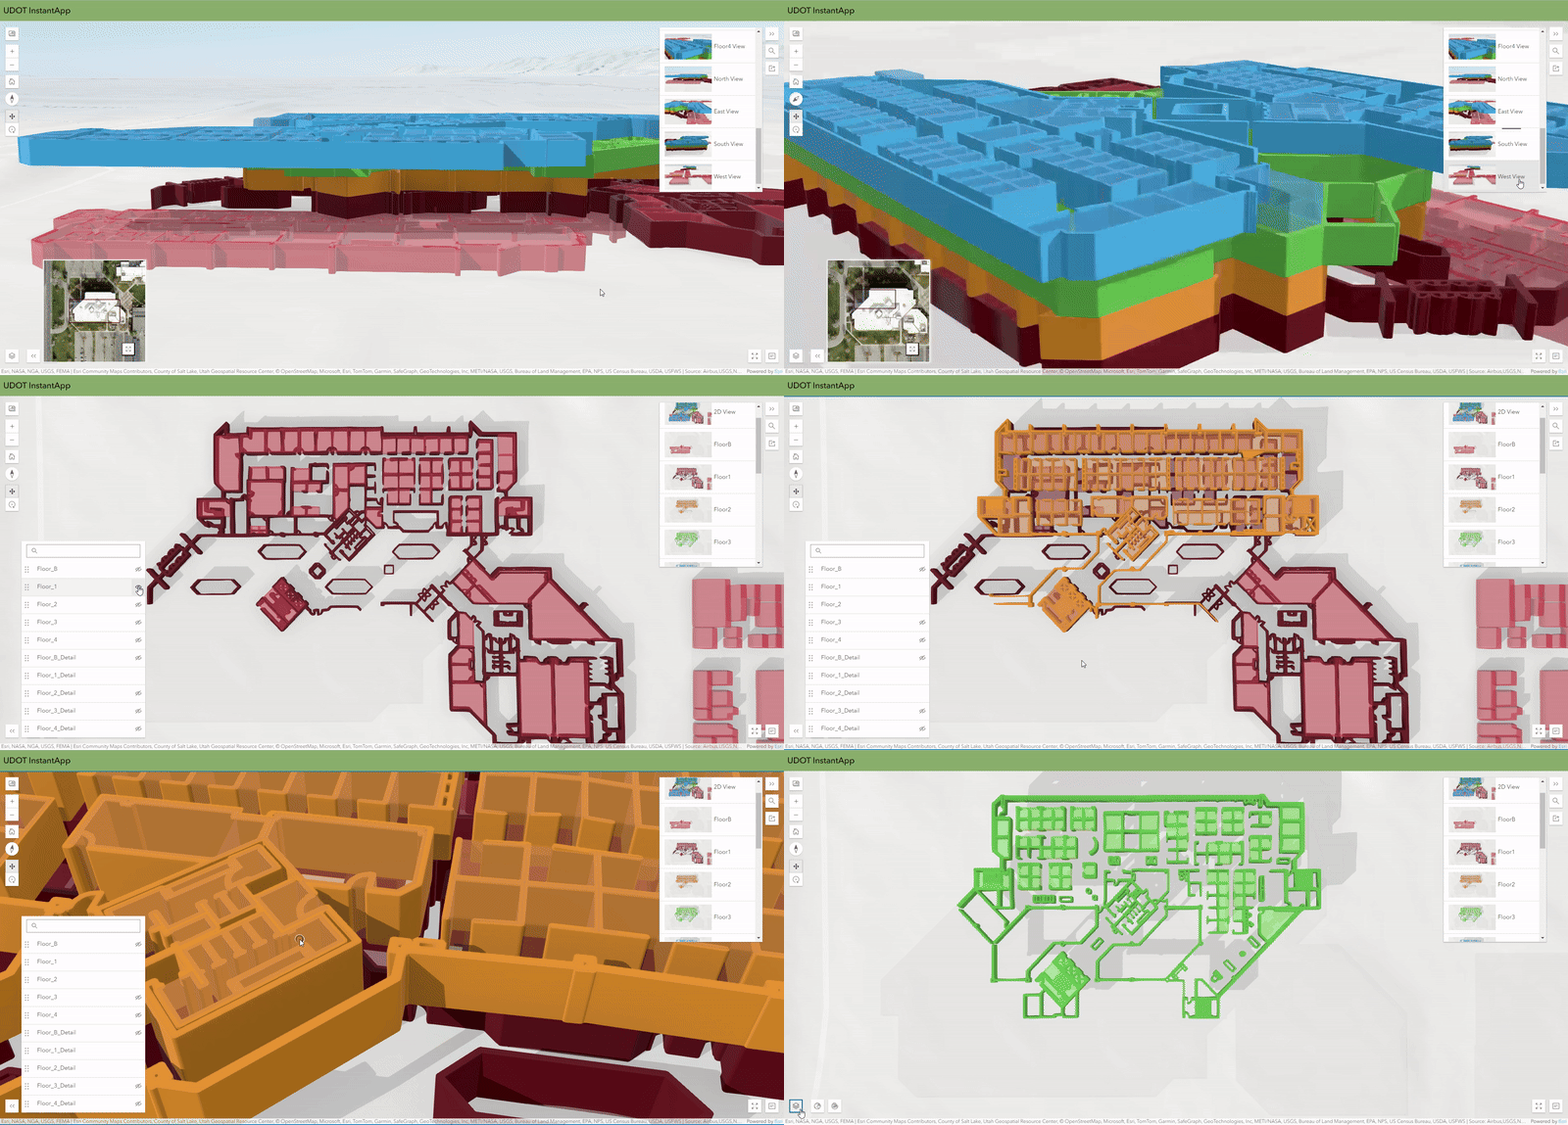
ArcGIS Instant Apps are a solution that makes it quick and easy to display your maps and data in an engaging manner. By choosing on of many templates then setting basic configurations, you can quickly share an application that suits your audiences needs.
This proposed solution allows internal staff to view room-level information and can act as a navigational tool - it does not tell you how to get from point A to point B, but allows the user to view floor plans in 2D and 3D. Having the 3D capability can really get a feel of how things look in the building before being there in person. Being able to select different features and get a pop-up of information is also valuable.
The first step was bringing the data in ArcScene, which was simple as starting a Scene, browsing for and selecting the UDOT Floor Plans feature layer package. This brought in 10 layers: 5 detailed line drawings and 5 polygon layers with feature information.
For each of the polygon layers the main attribute chosen to visualize was the Floor (number) adn the 3D drawing style was chosen. Going into the 3D options the attribute values could be set. Each layer got a different color at 50% transparency and the height was set to 3m. For each layer, the elevation was set to be relative to the ground. Depending on what floor it was, it varied in 3m increments. The basement was -3m (because it is underground), the 1st floor as 0m, the 2nd floor as 3m, 3rd as 6m and 4th as 9m. There is additional option for labels, but decided that was too cluttered.
For the line layers, no attribute was visualized and the 3D path drawing style was selected. The drawing profile was a wall style and the color was set similar to the polygon pair, but at 100% opacity. These layers were also set to a fixed height of 3m and set the elevation relative to the ground like their polygon counterparts.
In the Scene Viewer the basemap can be set and for this scene a topographic map with 50% transparency (to be able to see the basement layer) was set. There is option to do 3D basemaps, but it was not necessary and made the scene more busy.
The final thing that was done was in the Slide Manager and different snapshots of the scene were taken. Each layer got a '2D' snapshot, with the other layers toggled off. Then the view from each N/E/S/W was taken for general observation.
Right in the ArcScene, underneath the Save button, there is a button that shows a few different apps you can bring the Scene into. Clicking on the Instant Apps, it brings you straight to the Create page. It starts you off with some template suggestions and asks questions, like 'What is your goal for the app', to help you filter through the different templates. This narrowed down the options and the 3D Viewer template was chosen and created. The Express version is the one that is first seen that gives the most essential configuration settings. Toggling it off, all the options for each section can be set.
The first section is Scene: Select a scene to display, view the information and set a map area that people can use.
The next section is About: Here you configure tools that provide the user information while using it (like an introduction window or header) and allow more map accessibility.
The third section is Interacivity: Configure different map tools (such as displaying the preset slides made in ArcScene! or adding Navigation controls), modications to the map can also be made (such as attribute filters, daylight settings, layer lists, etc.) This section generally covers all the different map widgets/tools that you would want displayed in the app.
The final section is Theme & Layout: Change the theme to dark/light and whatever color scheme makes you happy. Here you can set where you want each of the enabled map tools to be displayed.
Once everything is configured to your liking, hit Publish, change the sharing access and launch!

Choosing the right template and going beyond the Express setup functionality allows for a more comprehensive app to be set up. While ArcScene worked well, this brings in more widgets for the client/audience to work with. While not available for the UDOT data (because it isn't floor aware), there is the extended ability to add in Building Explorer and Floor Filter interactivity, which would be a great tool for our project. Instant App is a great to get familiar with the data and to get a better understanding of it in a quick, simple & interactive manner.
Due to not being able to work with floor aware plans, the Filtering interaction may be more inefficient. Filters need to be set up for each floor for the user. For larger buildings this can be a daunting task without automation. The particular layout, while did hit a majority of our desired solution points, wasn't able to deliver routing like Experience Builder or Dashboards could. This solution may not be aimed at our audience, however, this would be a great tool for showrooms or public viewing of the clients proposal/work. The client would generally like/need slightly more in-depth functions for working and viewing the data.
- Being able to bring in 2 different views into an application defenitely seems doable - to be able to show both 2D and 3D side by side.
- Routing is always important, such as being able to route to emergency exits or an evacuation location. While Instant App doesn't show routing, diving deeper into using rest services to bring in routing in may be an option.